Digital Photos – Editing photos
Part 4b
Topics
Editing a
digital photo
Brightness and focus (brightness, contrast, blur, sharpen, Saturation)
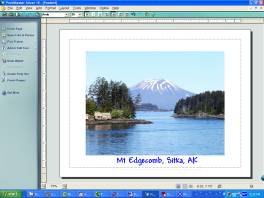
Adding text
Fix flaw (red eye, pet eye,
scratch, shiny face)
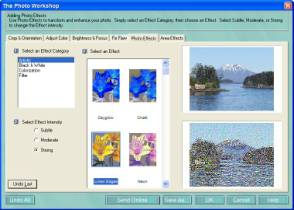
Photo effects (artistic, black and white, colorization, filter)
Frame (add, remove)
Adjusting the Brightness and Contrast of an Image
|
Click the “Brightness and Focus” tab. The top photo is the current photo; the bottom photo is the changed photo. |
Move the brightness and contrast sliders, and watch the bottom photo change. |

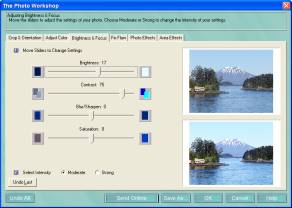
Try “moderate” and “strong” intensity to see the effect.
Click “save as” if you want to save the revised photo as a photo, not as a project. You can then click “OK” to put the revised photo onto the project.
Adding text:
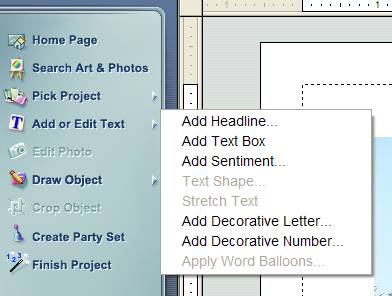
Click on “Add or edit text”. You will then probably want to select “Add headline” or “Add text box”. Try both to see the difference.
|
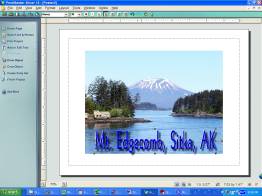
This is “Headline” text. |
The text box can be resized and dragged to a new location. |
|
Try various headline styles |
|


Adding text,
continued:
|
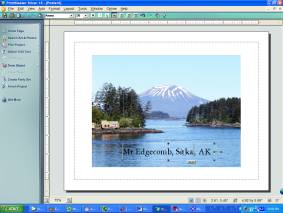
Result of clicking “Add text box”, double-clicking in the text box to see the cursor, then adding text. |
Double-click in the text box, to select all the text. |
|
Click on the down arrow to the right of the font box, and select a font; also select a font size. |
Click “B” for bold, “I” for italics, and “U” for underline. |
|
Click the paint bucket, next to the lightbulb, to change the color of the text. |
Note that the text box does not have to be within the borders of the photo. |


Text (creating, resizing, rotating), continued:
See page 2 for adding text, except use “add headline”.

Moving the mouse arrow near the handle outside the box will cause the arrow to become part of a circle. Move the mouse (while holding down the left mouse button) and the text will rotate.
|
|
Clicking the arrow next to the font name will show a drop-down menu of font names. Passing the mouse arrow over a name will show a sample of that name. Clicking a font name will cause all selected text to have that font. |

Fix flaw (red eye, pet eye, scratch, shiny face)
Add photo; click on photo; edit photo; fix flaw; select “red eye” from the drop-down menu.
|
Add photo; click on photo; edit photo; fix flaw; select “red eye” from the drop-down menu. |
Click the “+” magnifying glass until the photo no longer enlarges. |
|
|
Click on the correct size tool for the size of the pupil. Move the circle over the pupil. Select another size if necessary. When you have the correct size, position the circle over the pupil and click one or more times, to accomplish the desired change. Click “undo last”, “undo all” or “cancel” if you don’t like the change. Move the sliders in the horizontal and vertical scroll bars to get the other eyes into view, and change those eyes. If you made changes and like them, click “OK”. |
|
|
Select “shiny face” from the drop-down menu, and select the smallest tool. Click several times on the tip of the boy’s nose and below his nose. Try reducing or eliminating the reflection on the girl’s lower lip, and from two teeth. |


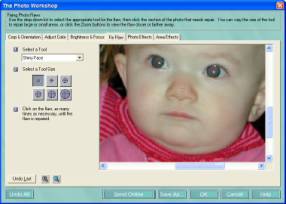
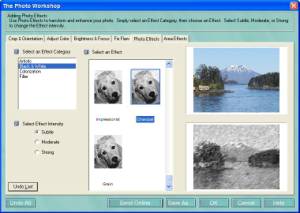
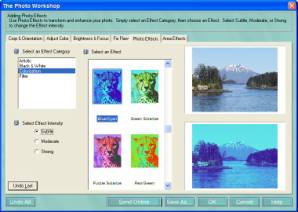
Photo effects (artistic, black and white, colorization,
filter)
|
Try various artistic effects by clicking on the name or the colored area above the name. |
Try various intensities, without using “undo last”. Click “OK” for the change you want to keep |
|
Try several black and whites with different intensities. |
Try several colorization with different intensities. |
|
Try various filters, such as making a puzzle. |
You may have seen pixilated pictures used by news services when trying to hide the identity of a person. |


Frame (add, remove)
|
|
Always start by clicking on the picture first. Clicking on the “Add” menu heading, then “Frame”, displays this window:
|
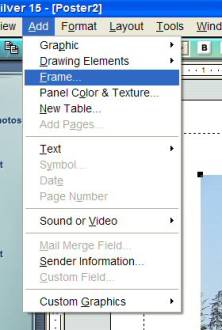

Be sure to have the picture as large, or larger, than the dotted line box. The frame will start at the dotted line. If you don’t like the frame, and want to change it or delete it, c lick on the “Add” menu heading, then “Frame”, to display the frame window again. Click on the “remove frame” button in the lower left corner.
Part 4c
Save as
Export
Changing the
File Properties
Changing the Resolution of an Image
Resizing an image
PrintMaster 15
prices as of 3/03/04
PrintMaster Select 15
$8.99 http://www.softwareandstuff.com/graph_prnmstsel15.html
$5.75 http://www.jcssoftware.com/html/software/2540/
PrintMaster Silver 15