Digital Photos – Editing
photos
Part 5
Topics
Installing Microsoft PhotoEditor.
Changing the Resolution of an Image
Resizing an image
Sending an Image by E-mail
Printing a photo
Using
Microsoft PhotoEditor to change the resolution of a photo.
Installing the program
The following instructions are for users who have already installed Microsoft Office 97 or Microsoft Office 2000. If you are installing Office from scratch, you will get the same options by selecting "Customize" instead of "Install Now".
- Insert Microsoft Office 2000 installation CD. If the CD does not start up automatically, you will need to go to [Start]->[Run] and then enter D:\setup.exe (or whatever drive your CD is on).
- The “Office Maintenance Mode” screen will appear.
- Select “Add or Remove Features”.
- In the “Customize” screen that pops up, click on the plus “+” sign located to the far left of "Office Tools".
- From the list that appears, select the drop down box to the left of Microsoft Photo Editor.
- From the drop down list, select "Run from My Computer".
- Click “Update Now”.
Opening the program
Click on Start, Programs, Microsoft Office Tools, Microsoft Photo Editor.
Configuring
On the View menu, click on “Measurement Units”.
- Select “Cm” or “Inches” if you want to size the image by distance.
- Select “Pixels” if you want to size the image by pixels.
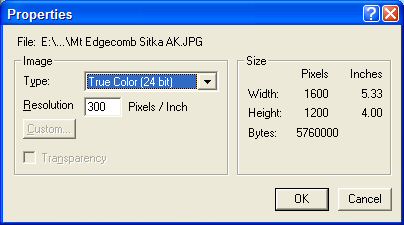
Changing the Resolution of an Image
- On the File menu, click
"Properties."
- In the Resolution box, type the value
you want. High numbers produce a small size photo that is looks nice when
printed, but goes far off the screen when viewed on a monitor. Low numbers
produce a larger photo that may have visible pixels when printed. A
resolution of 72 is typical for viewing on a monitor. For email, change
the resolution to 72, then click "OK."
Look at the physical size of the same image, at different resolutions.
It’s apparent that we need to change the physical size of the image when
displayed on a monitor at 72 pixels/in.

We have said that 72 dpi (dots, or pixels, per inch) is normal for a monitor. Here are some possible monitor resolutions.
48 dpi for 600x480 on a 17” monitor
54 dpi for 600x480 on a 15” monitor
72 dpi for 800x640 on a 15” monitor
64 dpi for 800x600 on a 17” monitor
82 dpi for 1152x864 on a 19” monitor
92 dpi for 1152x864 on a 17” monitor
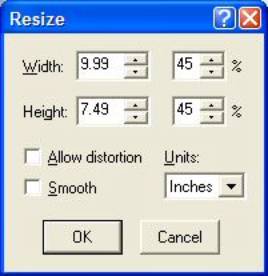
Changing the Display Size of an Image
- On the Image menu, click
"Resize."
- In the % box, 10 is actually 100.
Clicking the down arrow changes the physical size by 5% for each click. At
45%, the image, when displayed on a monitor with normal (72 dpi)
resolution, will be about 10 inches across. Click “OK” when you have achieved the desired physical size.
The width and height, shown below, are based upon the resolution set in
the previous stop (changing the resolution of an image).

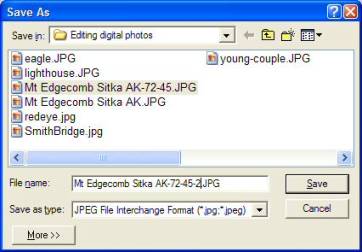
Changing the File Size of an Image
- On
the File menu, click "Save as."
- Rename the file, such as adding a “2” at
the end of the file name.
- Click on “More” to show additional options.
- “Save as type” should be “JPEG” file format for most purposes.
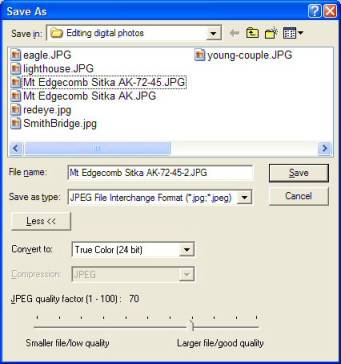
- Use “True Color”.
- Move the slider so the JPEG quality is about 70. 100 is highest quality. I have found that 70 retains good quality for photos to be seen on monitors, while nicely reducing the file size.
Important
Summary
for sending a photo in email:
1.
Change
the resolution to 72dpi.
2. Change the display size to 720 x 540
pixels for landscape mode and 403 x 538 for portrait mode.
3. Save as a jpg file format with about
70% quality or 30% compression.
Sending the Mt Edgecomb jpg file as-is
resulted in a file of 414K.
Changing the resolution from 300 to 72, and resizing to 8 x 6 inches, reduced the file size to 39K, which is an excellent file size for email.
Sending an Image by E-mail
- You can send an image as an e-mail
attachment, using the following steps:
- On the File menu, click
"Send."
- Your e-mail program starts, a new
message is created, and the image is attached to the message.
- Send as you normally send e-mail.
Printing a photo
DO NOT change the display size.
DO NOT change the file size.
DO NOT set the JPEG quality below 100.
This retains the high quality of the photo from the camera or from a scan.
Export or “save as” the photo as a JPEG file, if the photo is not already JPEG format, then print.
Be sure to adjust the printer properties to:
Glossy photo paper (use for best image quality)
Maximum quality
Color (not black and white)
Printers
Ink jet printers are the most common printers for home use. It is not necessary to buy an expensive “photo” printer. The Epson C-80, at $125, has special ink that is water resistant and light resistant. Other printers may also have similar ink characteristics. Read the printer information carefully.
Ink
If people will handle your printed photos, you will want to use a printer with water resistant ink, or fingerprints will be etched into the ink. Unless printed photos are kept in a photo album, they will probably fade by either direct or indirect sun light. This is why it is important to use ink that is water resistant and light resistant.
Resolution
Click on the File menu and then Print. Click on the “Properties” button on the printer window. You may be able to select higher quality and slower speed. When my printer is set on glossy photo paper and color printing, the printer defaults to 720dpi. At this print resolution, each dot-to-dot spacing is about ½ the thickness of a human hair. For higher resolution, I can click the “Advanced” button on the Properties window, and set the resolution to as high as 1440dpi, or about ¼ the thickness of a human hair.
Paper
Normal paper is made of fibers. The ink drops from the printer will follow the fibers, creating a blurred, low-resolution photo. Glossy paper is coated so the ink drops stay in their sprayed position, creating a sharp, high-resolution photo. Epson glossy photo paper is available at Costco and www.costco.com at 120 sheets for $19.99. The item number is 687814. This is the Costco information on this photo paper: Glossy finish; Heavy-weight for cards and photos; 99 bright white; 52 lb; 120 sheets; Epson Model: EPSS041141-100; Dimensions: 8.5" x 11". If you are not a Costco member, there is a 5% surcharge. The total price, including shipping, is still less than buying this photo paper elsewhere.